Every great structure begins with a single drawing, but it’s the ability to decode that drawing that separates a smooth build from a costly mistake.
In the construction and engineering sectors, precision is paramount. A single overlooked detail in engineering drawings can lead to costly delays, safety hazards, and structural flaws. This blog will guide you through the essential techniques for reading and extracting critical data from engineering drawings and construction blueprints the same foundation needed to automate data extraction from engineering drawings. We’ll dive into the key elements, including title blocks, blueprint symbols, and engineering drawing symbols. Your true blueprint to success lies in mastering the subtle language of lines, symbols, and notations.
Let’s dive into the art of reading engineering drawings—because, in this field, every detail matters.
Understanding the Basics: Engineering Drawings vs. Blueprints
While “engineering diagrams” and “blueprint” are sometimes synonyms, they are not entirely interchangeable.
Engineering drawings are detailed technical drawings or draftings that provide a detailed visual rendition of an object and how it works for manufacturing or constructing a project. They are highly unambiguous and can be interpreted in one way only. Historically, these were reproduced as blueprints, a method that gave rise to the term we still use today. While technology has advanced, the principles remain the same: clear communication of complex data.
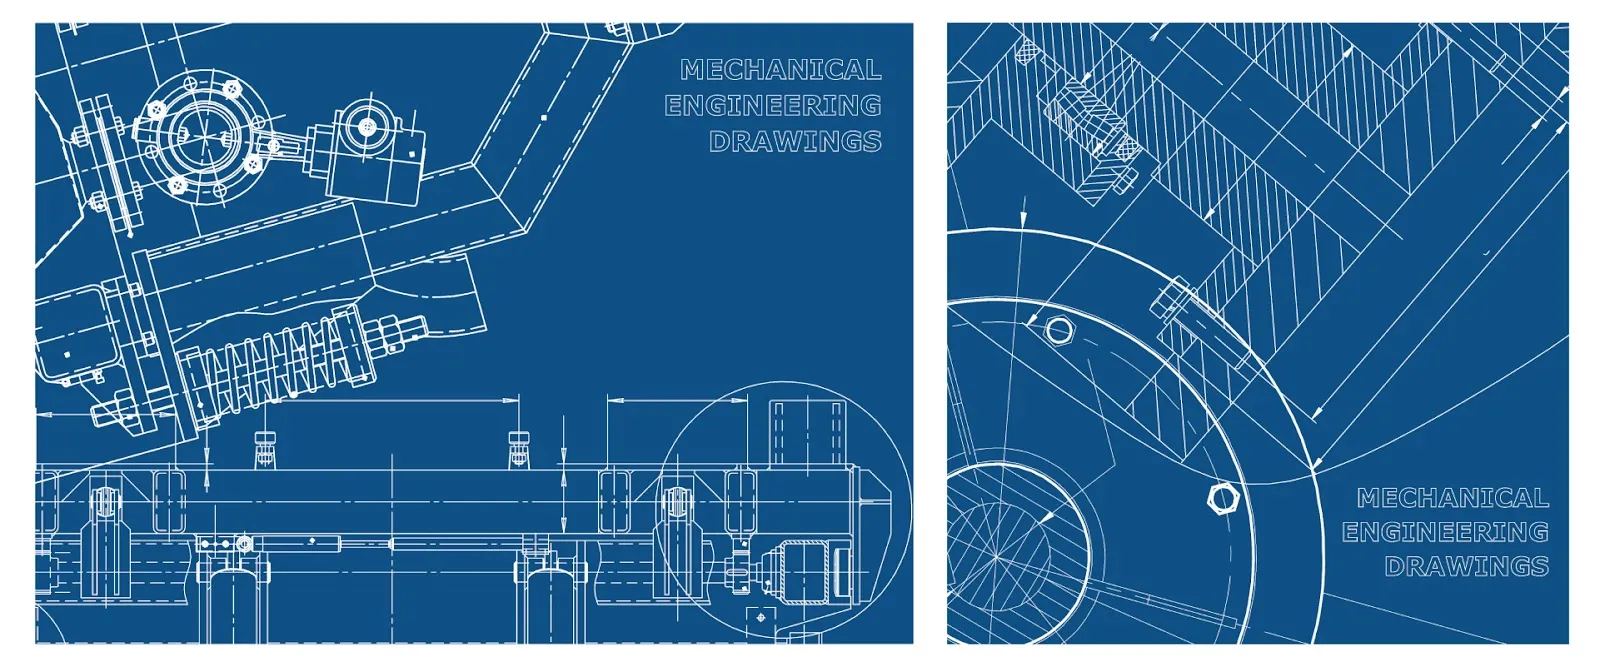
Types of Information Blocks In An Engineering Drawing
A. Title Block
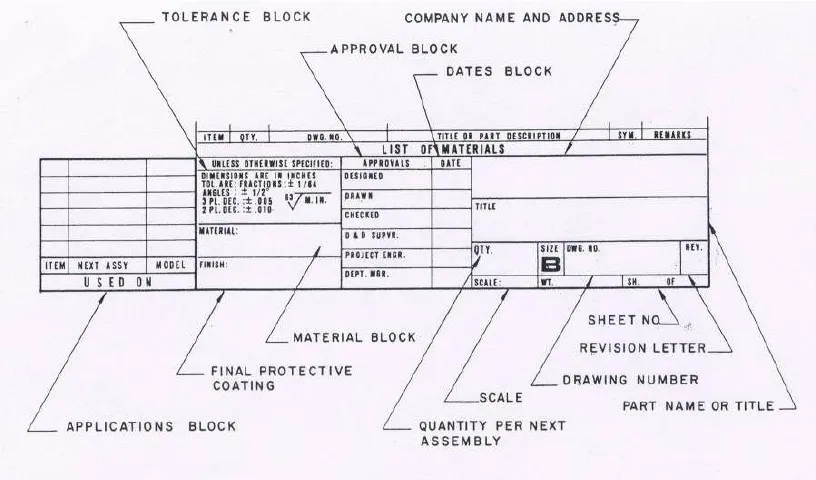
The title block is one of the most critical components of an engineering drawing, usually located in the bottom right corner of the drawing. But what information in a drawing's title block identifies the project? Typically, the title block includes:
- Drawing Title: The name or description of the drawing.
- Drawing Number: A unique identifier for the drawing.
- Revision Number: Indicates the version of the drawing.
- Project Name: The name of the overall project.
- Date: When was the drawing created or last revised?
- Drafter’s Name: Who created the drawing?
- Scale and Units: The ratio of the drawing size to the actual size.
- Approval Signatures: Who reviewed and approved the drawing?
These details are crucial for ensuring that the right drawing is used at the right time in the project’s lifecycle.
B. Revision Block
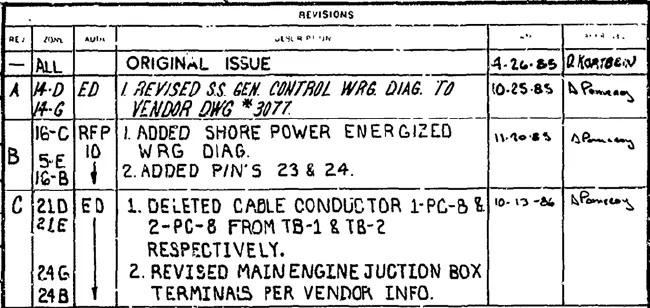
It tracks any changes or updates made to the drawing over time. It lists the revision number, date of revision, and a brief description of what was changed. This block helps maintain a clear record of modifications and ensures that all team members are aware of the latest revisions.
C. Legend Block
The legend block explains the symbols and notations used in the drawing for clarity. This block includes explanations for the various engineering drawing symbols and blueprint symbols used within the drawing. This block is crucial for avoiding misinterpretation and ensuring that all symbols are understood uniformly by everyone who uses the drawing.
D. Bill of Materials (BOM) Block
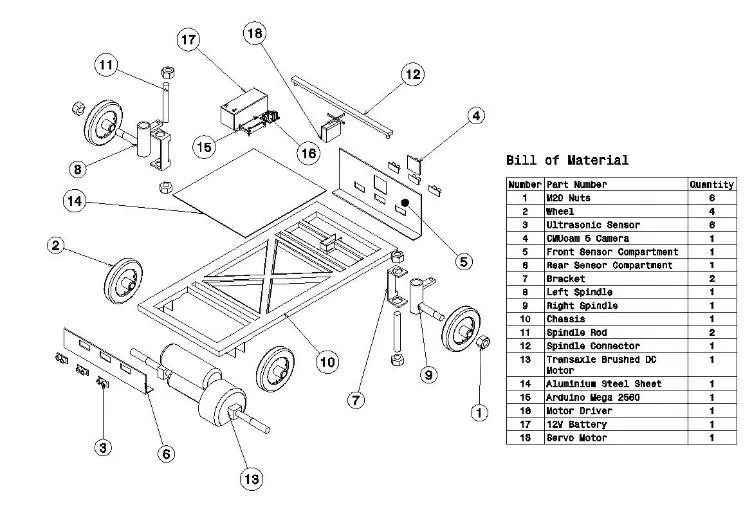
BOM lists all components, materials, or parts required, along with quantities and specifications.
Purpose of the BOM Block:
The BOM block is designed to ensure that every material and component necessary for the project is accounted for, thus facilitating smooth procurement, assembly, and construction processes. It is a comprehensive checklist that guides engineers, project managers, and procurement teams throughout the project lifecycle.
Contents of the BOM Block:
1. Part Number: A unique identifier for each item, which simplifies the process of referencing and ordering materials.
2. Item Description: A detailed description of the material or component, including specifications like size, type, and material composition.
3. Quantity: Specifies the exact number of each item required for the project. This is critical for budgeting and ensures that the correct amounts are procured and used.
4. Material Specification: Sometimes, the BOM will include information about the material’s grade or specific properties needed for the item, ensuring the right materials are used in the construction process.
5. Vendor Information: In some cases, the BOM may also list preferred suppliers or manufacturers for specific parts, which can streamline the procurement process.
6. Additional Notes: Any special instructions or considerations regarding the use or procurement of the materials can also be included.
Blueprint Symbols and Drawing Notations
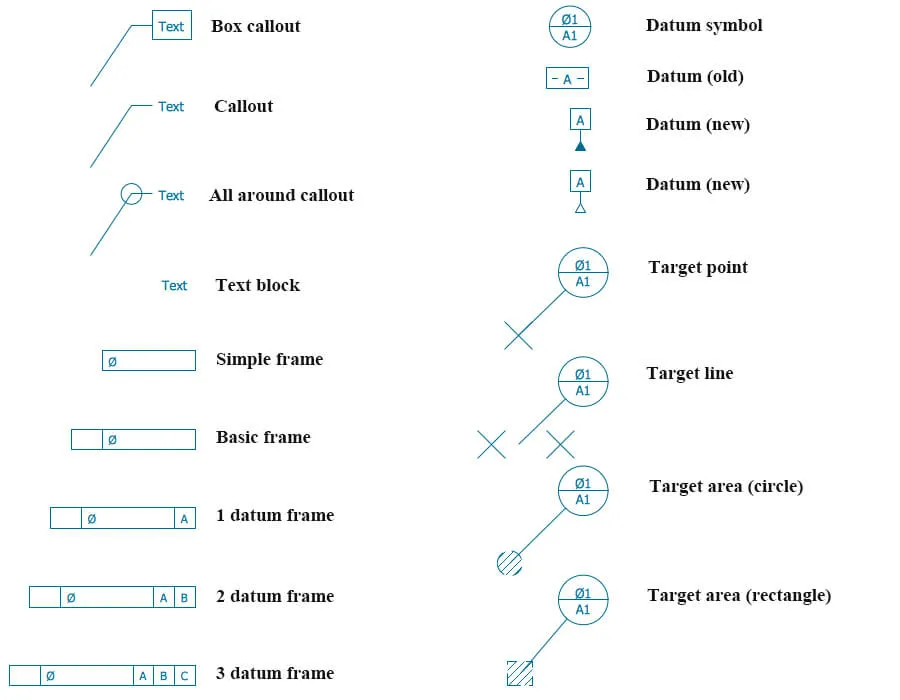
Engineering drawing symbols are the visual shorthand used to convey specific information quickly and clearly. These symbols include mechanical drafting symbols, projection drawing techniques, and engineering drawing notations that inform everything from material specifications to assembly instructions. For instance, they might consist of various symbols in drawings representing different materials, finishes, or processes.
Geometric Dimensioning and Tolerancing (GD&T) is a standardized system that uses symbols on engineering drawings to convey precise instructions to manufacturers. It specifies the required accuracy and tolerance for each feature of a part, ensuring that the final product meets the designer's intent. GD&T is essential for communicating the level of precision needed, helping to control variations in manufacturing, and ensuring that parts fit together correctly and function as intended.
Top 12 Manual Challenges of Reading a Technical Drawing
Interpreting engineering drawings isn’t always straightforward. Outdated or poorly drafted drawings can present significant challenges.
- Symbol interpretation: Technical drawings use a wide array of specialized symbols that represent different components, materials, or processes. Misinterpreting these symbols can lead to serious errors.
- Scale and proportion: Drawings are often not to scale, or use different scales for different views. Understanding and correctly interpreting scale is crucial for accurate comprehension.
- Multiple views: Complex objects are typically represented by multiple views (e.g., top, front, side). Mentally reconstructing the 3D object from these 2D representations can be challenging.
- Hidden features: Dashed lines often represent hidden features. Visualizing these unseen elements and understanding their relationship to visible parts can be difficult.
- Tolerances and dimensions: Interpreting dimensional information, especially when tolerances are involved, requires careful attention to detail and understanding of manufacturing processes.
- Specialized notations: Different industries have their own specialized notations. For instance, electrical schematics use very different conventions from architectural drawings.
- Drawing standards: Various standards (like ISO, ANSI, or industry-specific ones) govern how drawings should be created and interpreted. Familiarity with the relevant standards is necessary.
- Revision management: Keeping track of changes across multiple revisions of a drawing can be challenging, especially in complex projects.
- Contextual knowledge: Many drawings require domain-specific knowledge to be fully understood. For example, a process flow diagram in chemical engineering might be incomprehensible without knowledge of the processes involved.
- Detail overload: Complex drawings can contain an overwhelming amount of information. Knowing what to focus on and what can be safely ignored requires experience.
- Cross-referencing: Large projects often involve multiple interconnected drawings. Understanding how these relate to each other and navigating between them can be challenging.
- Digital vs. physical: With the shift to digital drawings, there are new challenges in navigating and interacting with drawings on screens, especially when dealing with large or complex drawings.
5 Tips to Read Engineering Drawing Symbols Accurately
- Understand Material Symbols: In construction and manufacturing drawings, symbols represent specific materials. For example, steel, concrete, and wood have distinct symbols, crucial for understanding the materials involved in the project.
- Identify Dimensioning and Tolerancing Symbols (GD&T): These symbols communicate the required precision for manufacturing components, ensuring that parts fit and function correctly. Understanding GD&T is essential in component manufacturing.
- Interpret Structural Symbols: In construction drawings, symbols for beams, columns, and other structural elements are vital. These symbols provide information on the type and placement of these elements.
- Use Project-Specific Legends: Each project may have a legend that explains unique symbols used in the drawing. Always refer to this for clarification.
- Practice with Real Drawings: Regularly reviewing and interpreting real-world manufacturing and construction drawings will help reinforce your understanding of these symbols.
Understanding these symbols ensures that components are manufactured to specification and that construction projects are built according to design, reducing errors and improving overall quality.
Turning Engineering Drawings into Actionable Insights
Extracting data from engineering drawings involves more than just reading the lines. It's about understanding the relationships between different components and how they fit together in the final project. Here's how this process has evolved:
- Engineering Drawing Software: The transition from traditional drawings to data-centric models has been transformative. Where we once relied solely on visual interpretation, we now have access to a wealth of embedded data that can be algorithmically extracted and analyzed.
The Power of Intelligent Engineering Drawing Systems
Intelligent Drawing Systems: These go beyond basic Computer-Aided Design (CAD) to incorporate elements of Building Information Modeling (BIM) and Product Lifecycle Management (PLM). The result is a drawing that's not just a visual representation but a rich data source that can be queried and analyzed programmatically.
- Example: Consider a complex piping system in a chemical plant. In a traditional drawing, you'd see lines representing pipes, with annotations for diameters and materials. In a modern, data-rich drawing, each pipe segment is a data object. It carries information about its material composition, pressure rating, fluid type, flow rate, maintenance history, and even its supply chain details. This wealth of information can be extracted and used for everything from stress analysis to procurement planning.
Title Block as a Dynamic Data Structure: The title block is a perfect example of how even seemingly simple elements can be leveraged for greater efficiency. In advanced systems, it can automatically update project phases, track revision histories, and even integrate with project management software to reflect real-time progress and changes.
AI in Engineering Drawing Interpretation: The Future
One of the most exciting developments in this field is the application of machine learning and artificial intelligence to engineering drawing interpretation. We're now seeing systems that can "read" legacy drawings, extracting data from PDFs or even scanned paper documents. These AI systems can recognize standard symbols, interpret handwritten notes, and even infer relationships between components based on their relative positions in the drawing.
No More Manual Reading of Complex Engineering Diagrams
AI-assisted process of reading engineering drawings has been a game-changer for engineers. AI-driven algorithms can read everything from old, hand-drawn sketches to the latest CAD files, giving engineers the time to focus on problem-solving parts of the job. It’s a huge time saver.
Benefits of Using An AI-Driven Engineering Diagram Data Extractor
1. Multi-Format Comprehension
- Instantly reads and interprets various file formats (PDF, DWG, DXF, SVG, scanned images)
- Recognizes hand-drawn sketches, converting them to standardized CAD formats
2. Intelligent Engineering Drawing Symbol Recognition
- Identifies and categorizes symbols across multiple engineering disciplines
- Learns new symbols on-the-fly, adapting to company-specific standards
3. Automatic Bill of Materials (BOM) Creation
- Extracts parts information to create detailed, categorized BOMs
- Links BOM items directly to supplier databases for cost estimation and procurement
4. Version Control and Change Detection
- Automatically detects and highlights changes between drawing versions
- Maintains a searchable history of all modifications with annotations
Conclusion
The ability to read and extract data from engineering drawings is a critical skill for any engineer or construction professional. By mastering the interpretation of different information blocks and engineering drawing symbols, you can ensure that your projects run smoothly from start to finish. But, the manual effort of interpreting complex diagrams is quickly becoming a thing of the past.
With the advancements in AI, reading and extracting data from technical drawings can now be efficiently automated, freeing up your time to focus on innovation and decision-making. Let AI handle the intricacies of diagram interpretation, ensuring accuracy and consistency while you drive your projects forward.


